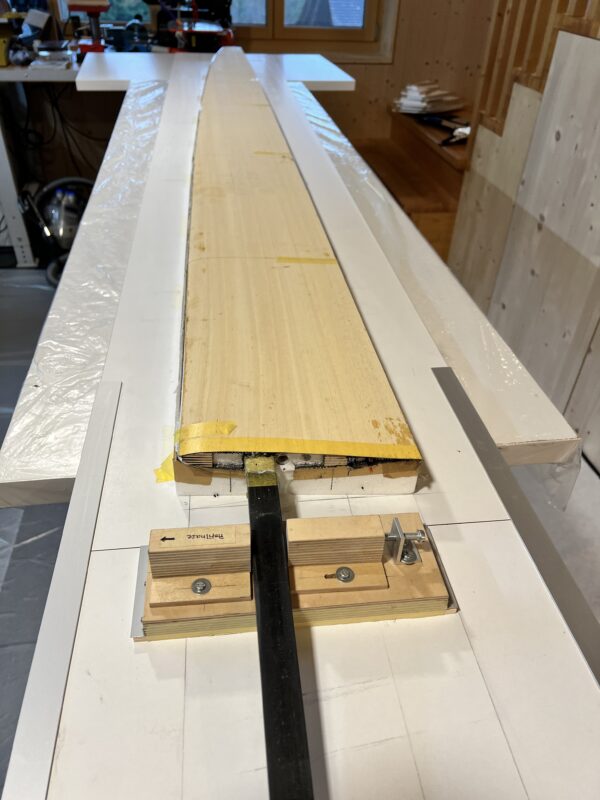
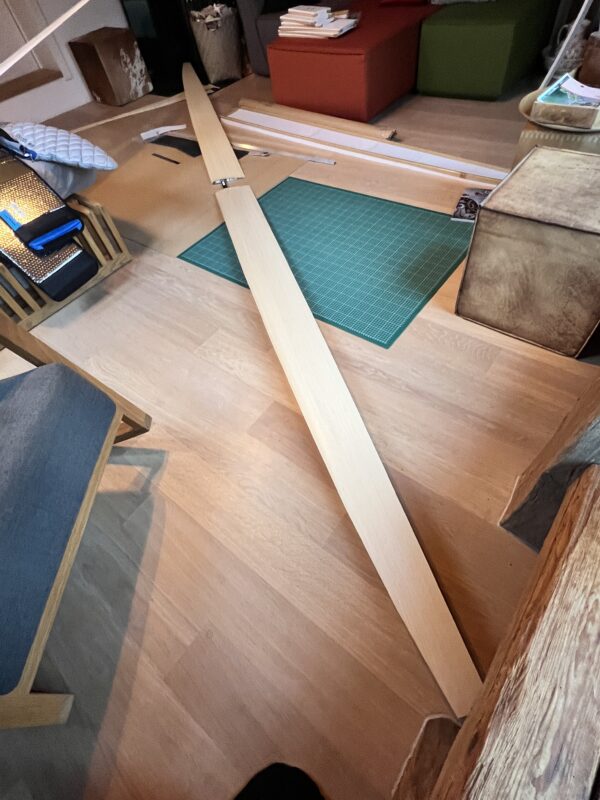
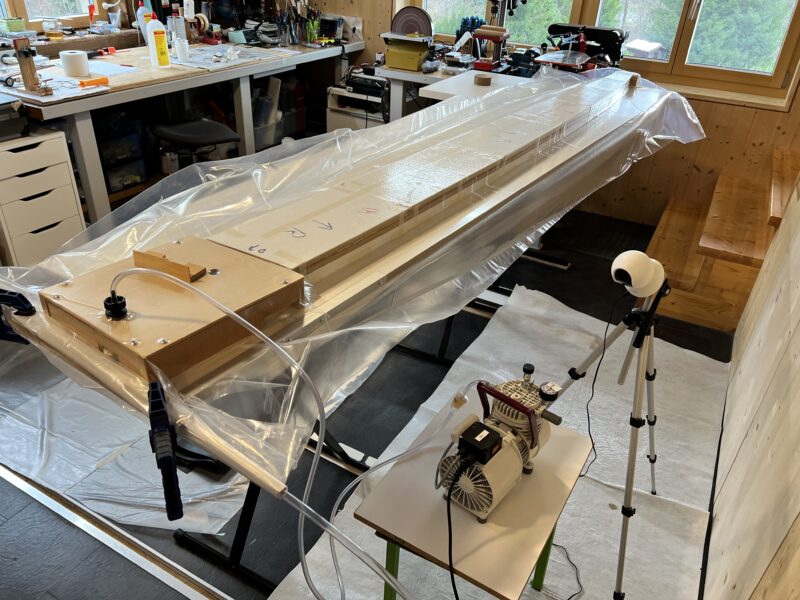
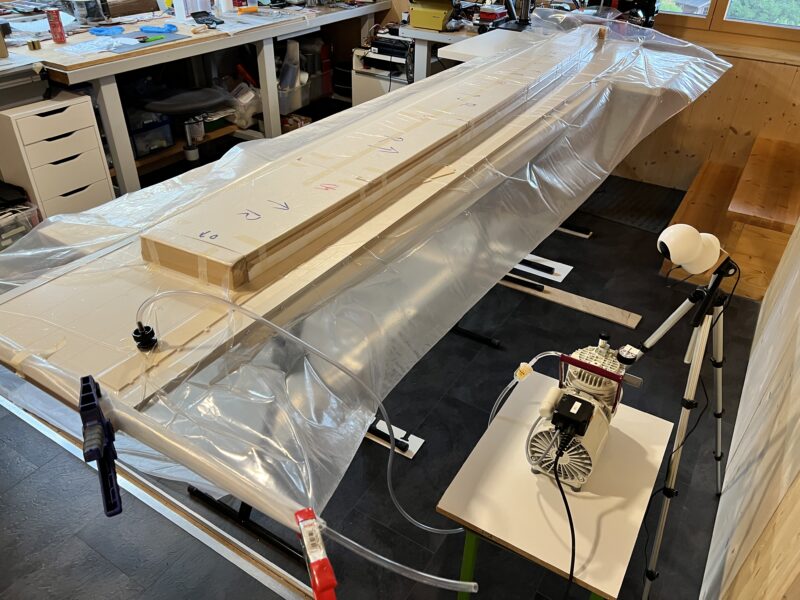
Both wings are now ready in their “rough” form. They came of the vacuum bag well, nice and straight and not too much sanding needed to level out the unevenness of the spars on the lower side. I’ll now let them rest a few days and then wait for a day with nice weather to sand down the ebechi and sand the leading edge into shape. 5.14m is a lot of wing!!!
Category Archives: Diana4
Diana4: closing the first wing
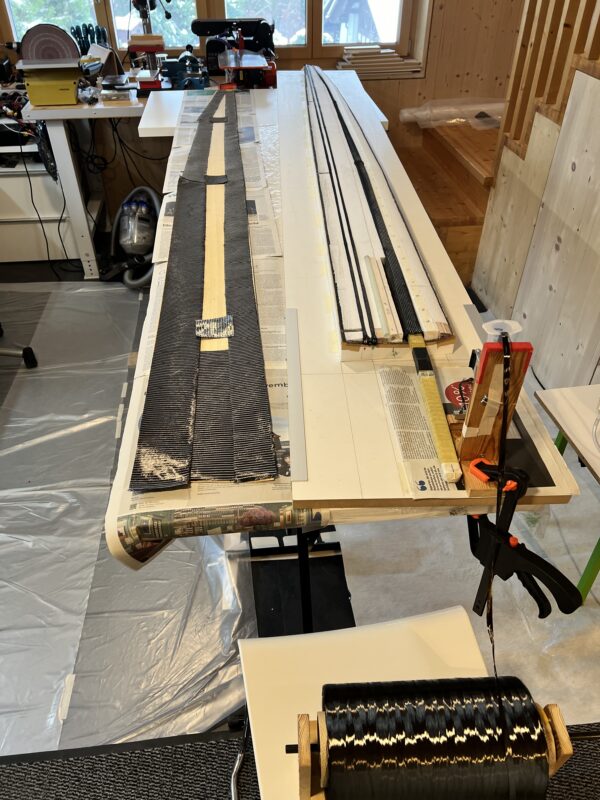
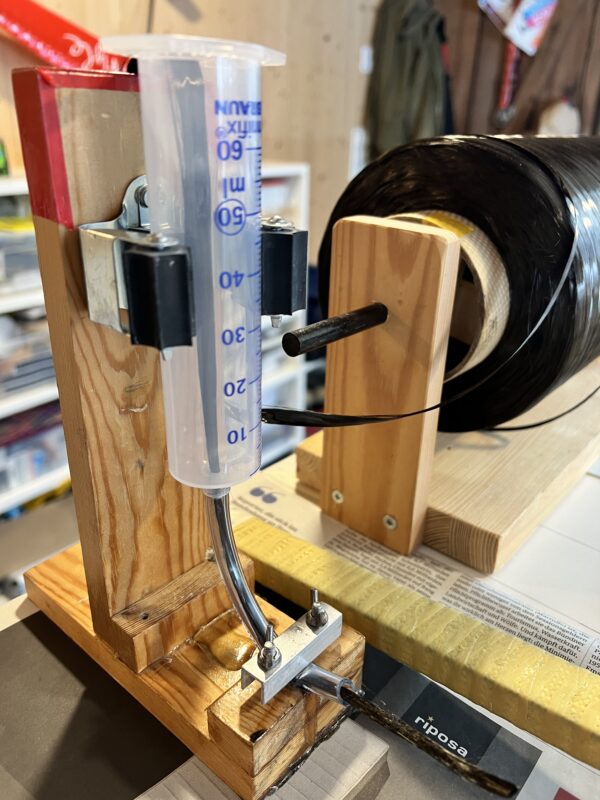
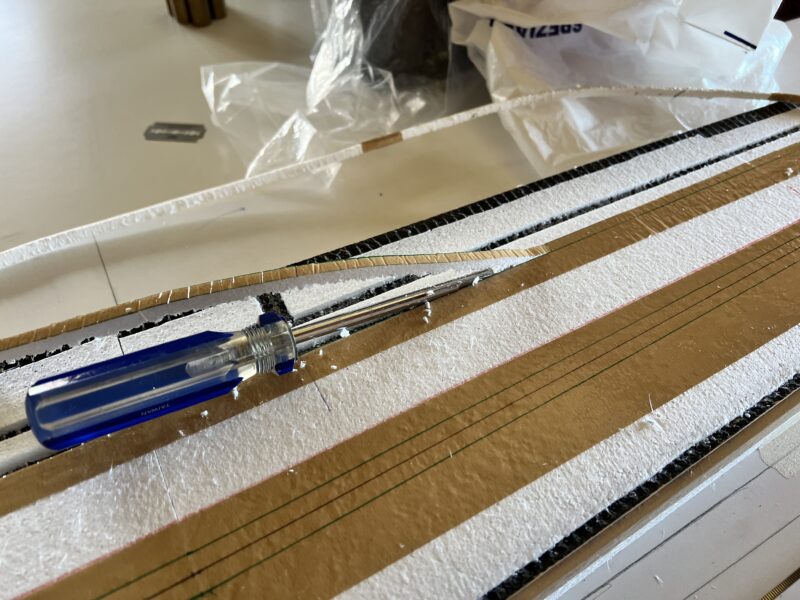
Today I closed the first wing, with the kind help of my mate EP. While EP inserted the carbon rovings into the opening for the main spar (using the tool with the syringe on the picture to apply the correct amount of epoxy resin to the rovings) I applied epoxy to all the spars and in all the cutouts of the wing. Once he finished inserting the first set of 26 rovings we inserted all the spars as well as the ballast tube and plywood. While he then inserted the remaining 26 rovings on top of the main spar I prepared the ebechi with biaxial carbon. We used three batches of 80 grammes of epoxy in total, around 40 grammes of which was thickened with micro-balloons to fill out the leading edge, cutouts between the control surfaces and levelling out the space between the main spar and the top of the wing (where needed). We then closed the wing and inserted into the vacuum bag. Here it will remain for the next 12 hours, under close watch of my webcam. Tomorrow I can unbag the first wing and then start preparing the 2nd wing for closing – hopefully sometime next week.
Diana4: preparing to close the first wing
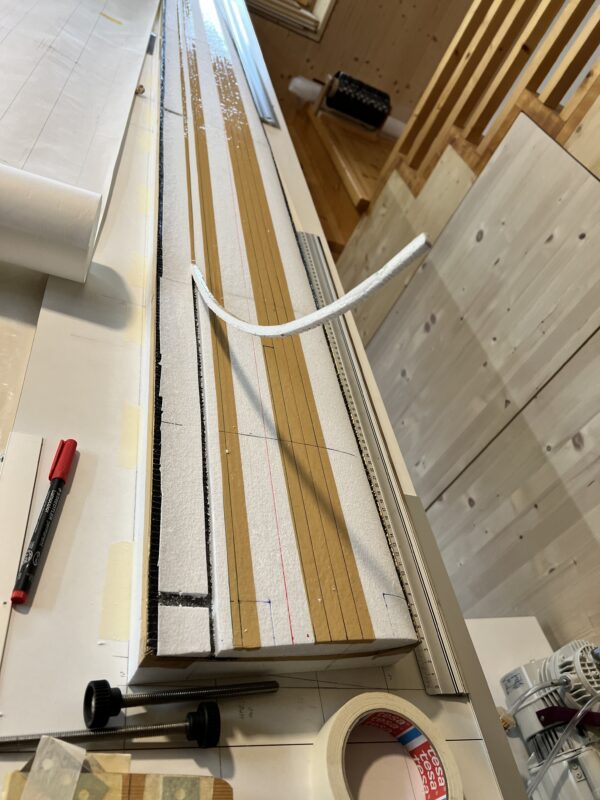
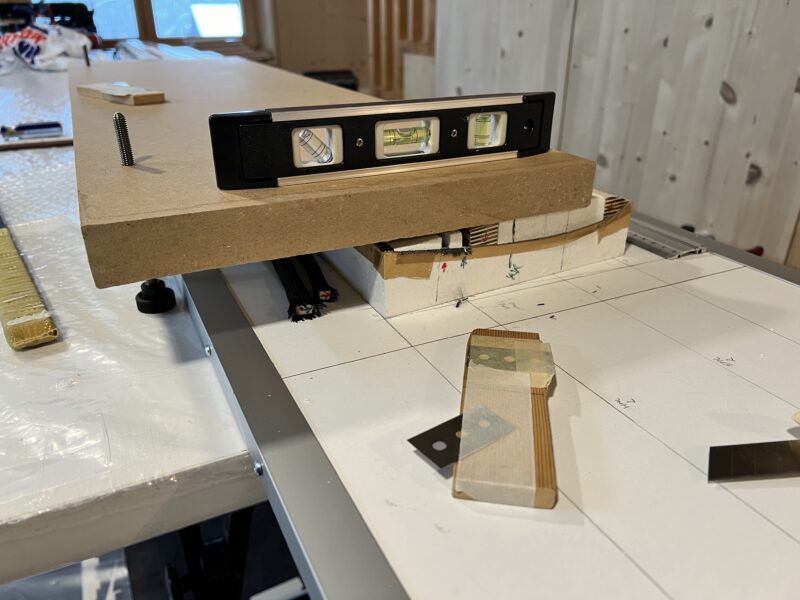
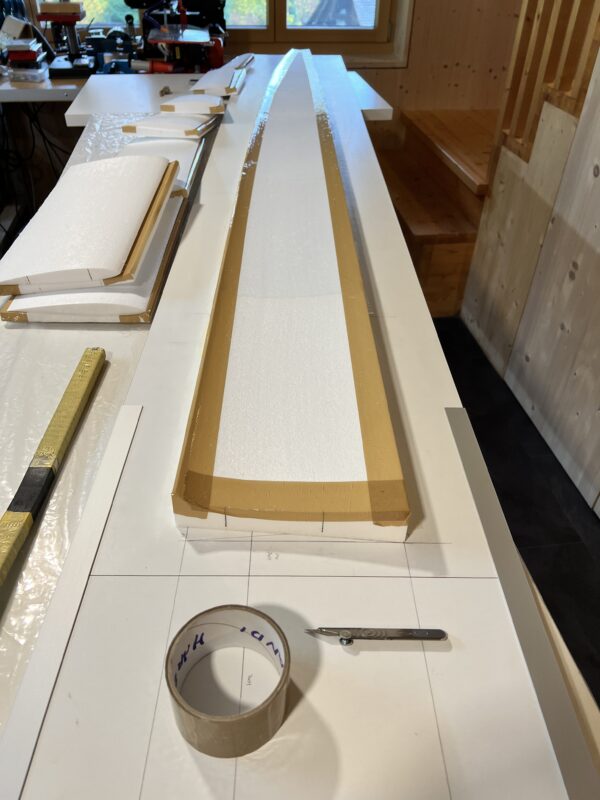
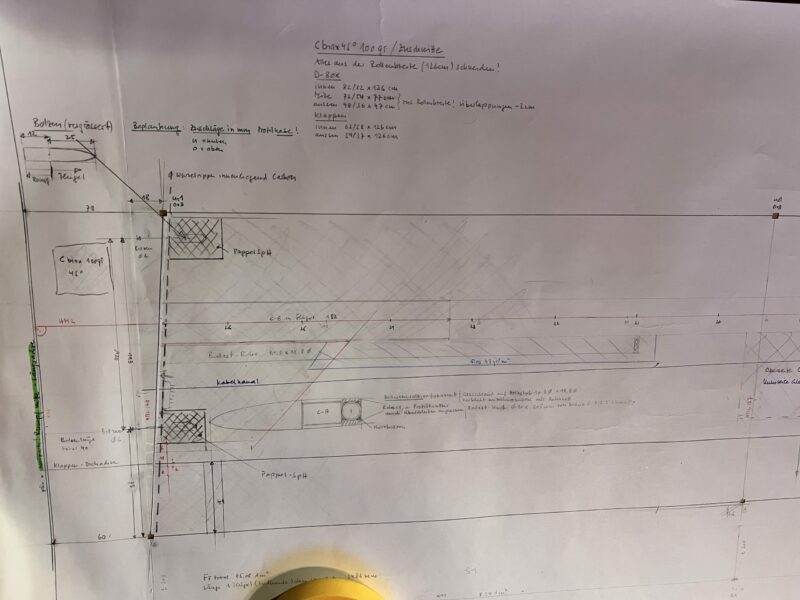
The preparations for closing a wing require quite a bit of very precise work. First I roughly mark the areas where spars, ballast tube, wiring and other bits need to come. Then I cover these areas with brown packing tape. Using waterproof pen I mark out the areas where I need to cut out foam. Cutting out the foam is done with a very sharp carpet knife (using multiple blades – they go fast). Cutting out the main spar is done along a level wooden board to make sure that the cut is perfectly straight and level.
Once the styrofoam is cut I carefully remove the bits that are no longer needed using a sharpened screwdriver. The foam of the two small spars on either side of the hinge of the control surfaces is used again to fill the carbon carbon sleeve and goes back into the wing. Also make sure you cut out a bit of the foam where the cuts between the three control surfaces are coming (so the edges of these control surfaces are epoxy with micro-balloons rather than foam). I then sand and clean out the areas where the foam is removed.
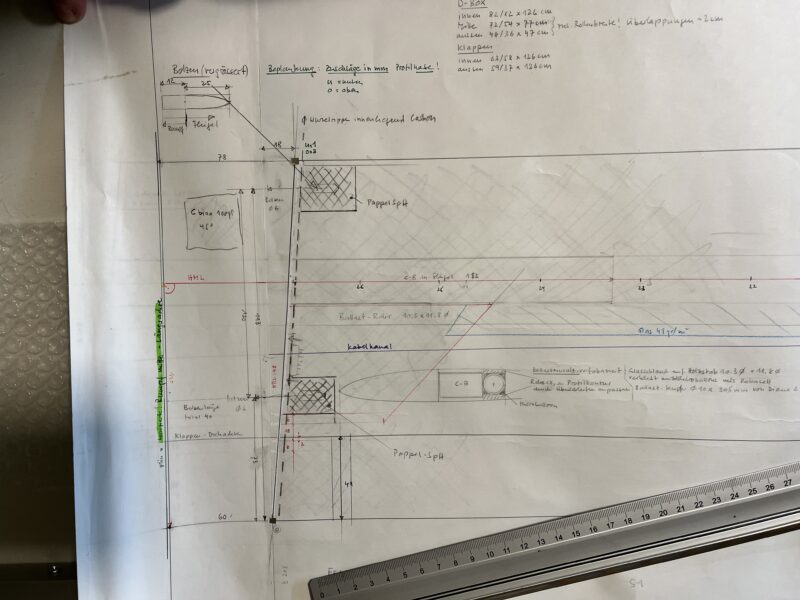
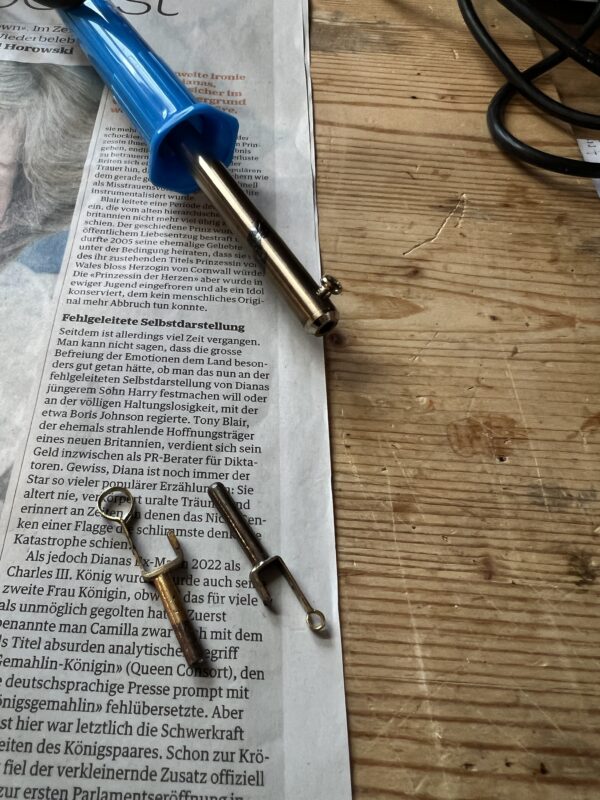
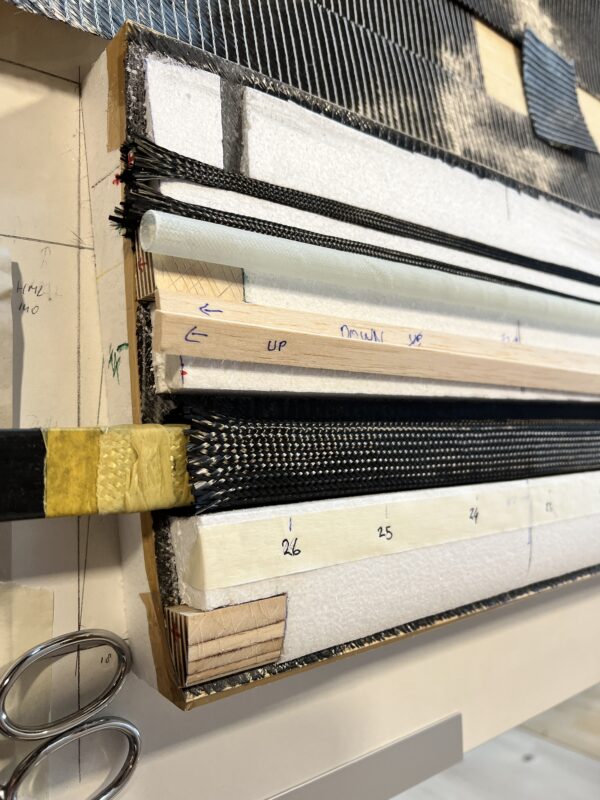
Next is the preparation of all the inserts. The two spars nearest the trailing edge of the wings consist of the R&G 200.5211 carbon sleeve, filled with foam that was cut out there. The main spar consists of three different carbon sleeves (R&G 200.4008 for the inner third of the main spar, EMC VEGA SC1062 for the middle third and R&G 200.5211 for the outer third). At the inner side of the wing the carbon sleeve starts around the wing joiner and its kevlar sleeve. From the end of the wing joiner onwards I prepare a core consisting of Rohacell. The right thickness of this core can be calculated based on the number of carbon rovings and the thickness of the sleeve. Our wing designer Georg usually prepares balsa inserts of the right thickness that you can put into the cutout of the main spar and simply sand the rohacell level with the wing foam core. At the inside of the wing I also insert two bits of plywood where the two aluminium plugs that will connect the wing with the fuselage will come. For the ballast tube I prepared two bits of balsa, one on top and one below, to make sure that it’s snugly in the middle of the wing next to the main spar. I also cut out the wiring channel using a small soldering rod and the two silver bits that Richi, another building team member, prepared. To ensure that I find the right place to cut out the control surfaces once the wings have been painted I drill four small holes 2mm from the trailing edge between the two rear wing spars at either edge of the control surfaces. Finally, I take out 2mm of foam at the leading edge of the wing, which is later filled with epoxy resin with micro-balloons to allow the leading edge to be sanded into perfect shape.
Once all bits are prepared I apply a bit of masking tape next to the main spar and mark out the number of carbon rovings that are to be pulled into the wing before closing it (the Diana 4 has 26 rovings at the first 4cm, decreasing to 1 roving for the last 10cm or so, on both sides of the main spar). Then I prepare all the tools for closing the wing.
Diana 4: upper sides of the wings
Today I bagged the 2nd upper side of the Diana4 wings, having done the first one earlier this week. Bagging the wing is not all that much work – less than an hour. It’s the preparations that take most time.
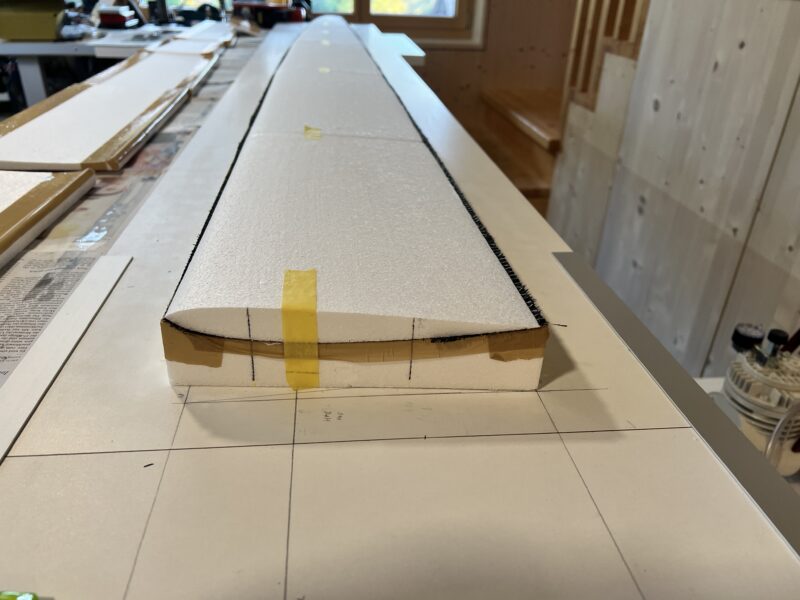
After preparing the foam cores (see previous post) comes the incredibly important work of drawing the layout of the wings onto the building board and positioning the foam shells. We build upside down (upper side first). Once all the measurements are done and double-checked I position the foam shells and glue them to the building board using painter’s tape. Then I apply thin brown packaging tape on the edges of the shell on the board as well as to the individual shells of the underside of the wing. It’s important to find a packaging tape that doesn’t stick to epoxy resin – the purpose is to avoid the shells sticking to the wing core or other shells.
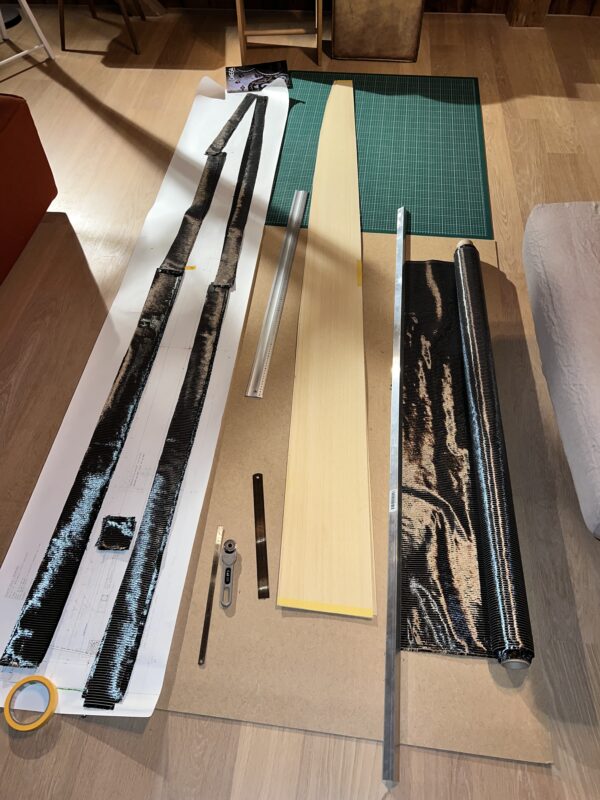
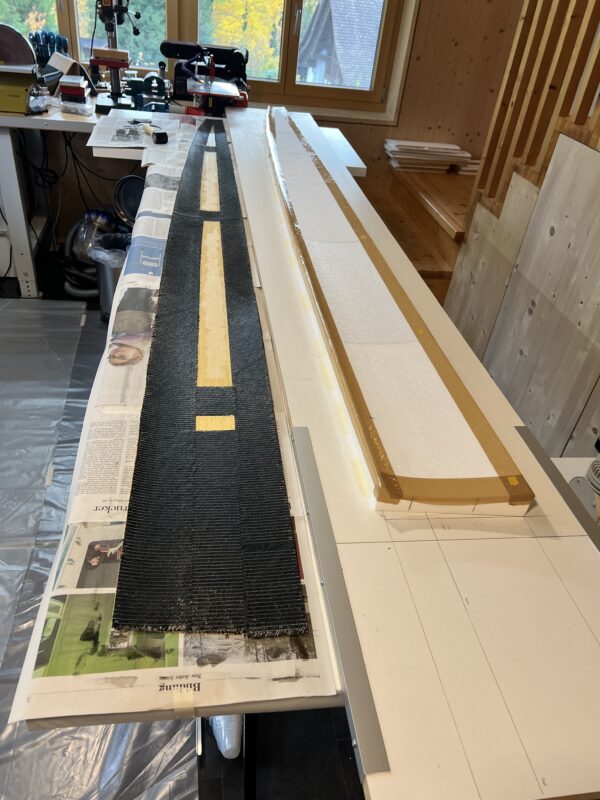
Once the board and shells are prepared I prepare the ebechi (abachi) wood. We use 0.6mm ebechi, prepared by a carpenter friend or purchased through RIK Modellbau. This ebechi is cut to size using the plan of the wings – important is to make the ebechi for the upper side approximately 4mm longer (depending on wing profile). I then draw the layout of the carbon inserts onto each of the four ebechi sheets (so I know where to position the carbon when glueing it to the ebechi). We rarely do a full carbon layup – that’s not necessary and would only add weight to the wings. The carbon inserts are just big enough to cover the carbon D-box at the leading edge of the wing, the control surfaces at the back of the wing as well as the positions for the servos and the wing joiner. Once the layout of the carbon inserts is drawn onto all four sheets I carefully sand the inner side (where the epoxy is to be applied) of each sheet and clean off the dust. I then apply a transparent primer (“Hartgrund”), 50% diluted, to avoid the epoxy completely soaking the ebechi. Allow this to dry out and another quick sanding and the ebechi is ready to be used.
Once all that is done it’s time to prepare the resin. I used around 60 grams of resin for the upper side. It is possible to do it with 10-15 grams less for weight watchers. Using a small roller I apply the resin to the parts of the ebechi sheet where the carbon layup is coming. I then put the carbon layup onto the ebechi and push it on using the roller. Then I use the roller to apply most of the resin to the carbon layup. I leave a few grams of resin and add a few drops of foaming agent and let this rest a bit. I then use a hard rubber roller and kitchen paper to roll excess resin off the carbon layup. Then use the soft roller to apply the remaining resin with foaming agent to the parts of ebechi not covered with carbon.
Then put the ebechi with carbon layup onto the shells. I use six or so small bits of double sided tape on the shells to make sure that the ebechi doesn’t shift. Then put the wing cores onto the ebechi, fix the outer ends in the right position with a bit of wax tape and fix the cores together with a bit of the same tape. Then close the upper shells, lightly fixing them into place with painter’s tape. Then bag the entire building board, use a vacuum cleaner to remove most of the air of the vacuum bag and then start up the vacuum pump. Stabilise the vacuum pump at -1.5 bar and let it run for 12 hours. I use a cheap webcam to watch the pressure of the pump so that I can go do something else and occasionally check the webcam on my smartphone. The entire setup runs over a timer that automatically switches off after 12 hours.
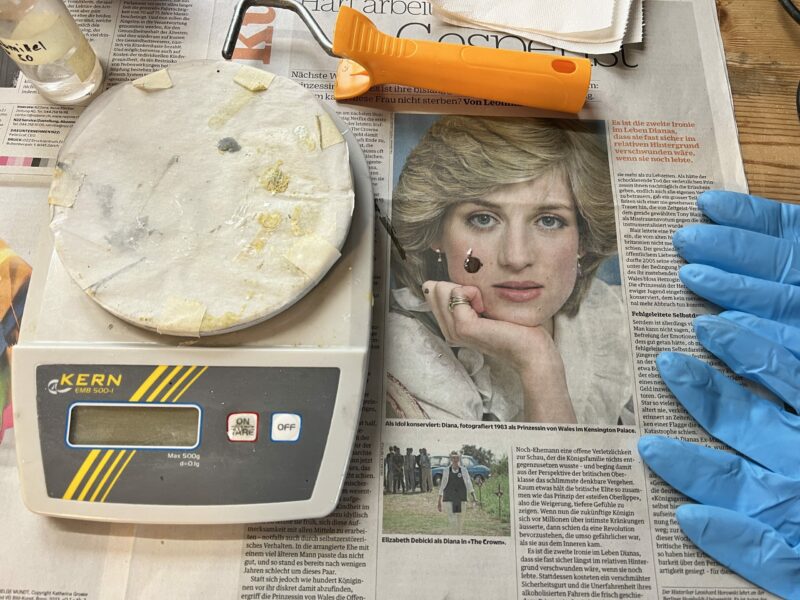
When I was cleaning up after bagging the 2nd wing I noticed the appropriate newspaper article used to protect my workbench (see last picture :-)).
Start building season Winter 23-24: Wings of the Diana4
The summer weather is still not showing signs of coming to an end and I’m trying to squeeze out as many hours of flying as possible. Shorter daylight hours however provides an opportunity to use mornings and evenings to start preparing for the coming winter’s projects. l’m expecting a nice Chocofly surprise in the next few weeks/months that will have priority, but shouldn’t be too much work. The main project for coming winter will however be the Diana4, which I’m hoping to maiden in Spring 2024. Work on the Diana4 already started last year. The fuselage is as good as done (just need to fit the canopy): I also finished the elevator and rudder, built the wing joiner and prepared the sleeves.
The next step is building the wings. We cut the styrofoam cores for the wings at the end of last year. The original Diana4 will have a wingspan of 18m, that means that our scale 1:3.5 will have a wingspan of 5.14m. As my car is just large enough to accomodate 2.5m wings, I will build them in one piece.That makes the wings easier to build and, importantly, saves weight.
Today I started preparing the building board. I’m normally using an 18mm MDF board of 260x40cm to build the wings. For the Diana4 I have extended the board with another 30cm. I’ll also need to extend my working table to accomodate the longer building board (I’m using IKEA tabletops, which are light, incredibly stable and perfectly straigth). After preparing the board and table I started preparing the foam cores. Using a vacuumcleaner with a brush I removed the “angle hair” on the cores, resulting from the hot wire cutting. I also removed the last 4-5mm of the trailing edge of the wing cores to ensure that the trailing edge of the wings is nicely sticking together and can be sanded really thin.
Next step is to draw out the wing layout on the table and prepare the foam shells.
Diana 4 and Monerai: canopy frame and seat insert
While waiting for the Ventus 2c to come back from the paint shop I’ve been working on the Diana 4 and the Monerai. For the Diana 4 I started work on the canopy frame. First I applied good quality painters tape to protect the fuselage from resin spillage. Then I applied two coats of liquid wax on the area where the canopy frame is built. Then came a coat of thickened epoxy with grey colourant. Allow some time for this to cure until it’s less liquid but still sticky. Then came a layer of 49gr glass, followed by a five carbon rovings going around the entire canopy (staggered so that they end/start in different spots). Then I built up the rest of the frame using epoxy with grey colourant and very much thickened using micro-balloons. It’s not sitting in the workshop to fully cure (needs a few days) before I can sand it into shape.
While waiting for the canopy frame to fully cure I also built the seat insert for the Monerai, using an old mould for the SB-14. The procedure here is very similar to making the canopy frame. The mould is waxed. Then apply slighly thickened epoxy with grey colourant. Allow to cure a while, but it still must be sticky. Then apply two layers of 160gr glass, also with epoxy with grey colourant.
As you can see in the pictures below I didn’t wait long enough to apply the glass and had a few nasty air pockets in the folds of the seat pan. These can be easily corrected with surplus epoxy thickened with micro-balloons. Allow it to cure, sand to shape and it’s good to go.
Diana4: maiden flight of the first Diana4!
Today we maidened the first of our three Diana4 – the one built by Georg. He finished it just last week (having started the build at the end of last year – very fast, as usual). His Diana4 came out at 6.4kg, 7.1kg with ballast.
As always with a brand new plane, it needed a bit of finetuning. Georg started off with the CG of our Diana2 (which has the same wing profile), but that turned out to be too far back. Also mixing in down elevator with the butterfly needed a few tries. Once he got the settings in the right range the plane just didn’t want to come down anymore. There is still some more fine-tuning to do, but it’s a wonderful glider that will surely see much “airtime”.
Diana 4: motor bulkhead and cockpit cover
Sometimes things don’t go quite as planned, even if you’ve done it plenty of times. Installing the motor bulkhead of the Diana4 was a pain. The carbon bulkhead was just a bit too big for the fuselage, and I was sloppy in making the first cut on the nose. I ended up having to remove the bulkhead (fortunately only fixed with a few dots of 5min epoxy) and sanding it down by mounting it on the drill and rotating it on a bit of 120 grain sandpaper. Even the second try wasn’t quite as good as I wanted it to be, but with a few corrections on the fuselage it will come out fine once the fuselage is painted.
In-between I produced two covers of the instrument panel. The first one in the mould that was spray painted, the second one using thickened epoxy as the “basis”. Making these small parts in the mould are good for using left over bits of glass. Two layers of 160gr, or a layer of 50gr, one of 100gr and one of 160gr are more than enough for a robust cover.
Diana 4: Instrument Panel
The full-size Diana 4 is not yet ready and we don’t have any pictures of what the instrument panel will look like. So I’ve had to make something up. Below is the result. It’s actually almost identical to that of our JS3. The only thing I changed is the logo at the top of the VNE chart. Click on the link below to get a printable PDF file – if that’s of use to anybody.
Diana 4: decals
The first of our three Diana 4, the one that Georg Staub is building, is nearing completion. It came back from the paint shop almost two weeks ago and Georg is now in the process of finishing the wings. It should be in the air in another month or so. So time for me to finish the decals. The decals I’ll be cutting are inspired by the Diana 2 logo, as well as the layout of the Diana 3 and the plans of the Diana 4 available on the internet. As there is no full scale Diana 4 as of yet, that’s all we have to work with for now. Linked through below is a full scale PDF of the decals, made by me, in case anybody else is interested and wishes to use them.
Diana 4 and Ventus 2c: tail sections
Earlier this week I picked up the rudder for the Diana 4. Fellow builder Georg built three of these for us, using the mould he made for the JS3 rudder. As usual it’s very nicely done and extremely light.
The tail sections of both the Diana 4 and the Ventus 2c are now as good as ready (of course the horizontal stabilisers and the Ventus rudder still need covering and painting):
- 45 degree angle reinforcement to avoid torsion in the vertical stabiliser (3mm balsa, covered with 49gr glass on both sides);
- vertical reinforcement to close the vertical stabiliser before the rudder
- rudders fitted and brass tubes (pull-pull system with kevlar wire) fitted
- elevator servo installed, including wiring
The pictures of the (transparent) tail section of the Ventus show best what’s where. We always prepare a sheet of 3mm balsa wood with 49gr glass on one side (glass applied in a 45 degree angle). The balsa wood reinforcements are then glued in with thickened epoxy resin and 49gr glass (also in a 45 degree angle). With the Ventus I also applied two thin carbon rovings – that’s because I felt like it and had it lying around, but it isn’t really needed ;-). Together, the two reinforcements give enough stability/torsional stiffness to the vertical stabiliser.
Diana 4 and Ventus 2c Stabilisers ready to cover
Ventus 2c and Diana 4 – fuselage servos
It’s often the small things that take up a lot of time. I spent quite a few hours building the frames/setup for the servos in the fuselages of the Ventus 2c and the Diana 4, as well as the bulkheads for the landing gear and the towhook of the Diana 4.
The picture below shows:
- The two units for the rudders. I will use the usual kevlar wire pull-pull system, using a small pulley that was designed and built within our club ages ago.
- The servo frames for the elevator servos. These are built into the vertical stabiliser and then connected to elevator using a carbon rod with 2.5mm (Ventus) or 3mm (Diana 4) threaded metal rods glued into the ends.
- The bulkhead for the towhook servo and the towhook entrance.
- The landing gear with bulkhead and servo setup.
Diana 4: installing the landing gear
The Diana 4 will get a retractable landing gear. We’re running low on the stock of landing gear made by our club ages ago and only have a smaller version left. It requires an 89mm wheel rather than the 103mm wheel we used for the JS3 (which uses the same fuselage as the Diana 4). It still looks nice enough though, and the difference will be hardly noticeable. To install the gear I cut out the doors from the fuselage using my dremel with a 0.8mm milling bit. To give the doors a bit of extra stiffness I covered them with a layer of carbon fibre (before cutting them out of the fuselage). The doors are then attached to the hinges, made of steel wires through a brass tube. The landing gear is attached to 4m plywood.
Diana 4: horizontal stabiliser
(Most of) the electronics
Yesterday we got most of the electronics for our Diana4, as well as parts for my Ventus 2c and two other gliders that members of our building team are currently working on (a scale 1:3.5 SB-14 and another Moswey III). The parts were supplied by Leomotion, as usual.
For the Diana and my Ventus 2C we will be using:
Chocomotion 10/10 on the brake and camber flaps
Chocomotion 8/6 on the ailerons
For all wing servos we are using the Chocomotion servo frames and aluminium levers (10/7/5mm).
MKS HV6130H on elevator
Chocomotion 12/9.5 on Rudder
In addition, we will use for the Diana4:
Chocomotion 12/9.5 for towhook
Chocomotion 180/30 for retractable landing gear
All Diana4 will get a FES motor: a Dualsky XM5060EA3-14, with a Freudenthaler Scale Spinner (43/6/0degr – mit Versatz) and a GM 18×10 Scale Prop and a Castle 100 Light ESC.
I’ll also put a FES onto my Ventus 2c, but will still need to determine which motor setup.
We’ve used all components before and have flown hundreds of hours with them – this is our preferred setup.
Diana 4: landing gear and seat
For the Diana 4 we will be using a landing gear that is slightly smaller than the one we used for the JS3 – it’s a bit shorter and we’re using a 89mm rather than a 104mm wheel. The reason is that we’ve been using landing gears that were developed within our club and produced externally well over two decades ago. We’re now on the last of our stock and only have just enough smaller ones left for the three Diana 4 that we’re building.
Using a small milling tool made by a club colleague I cut out the landing gear doors and did a dry fit of the gear and the frames to hold the gear and the towhook (made out of 4mm plywood).
Last week I also produced the seat of the Diana 4, using a mould that we made for the JS3. After waxing the mould I covered it with thickened and coloured epoxy resin. Let it settle for a few hours and then put on two layers of 160gr glass. Unfortunately I didn’t have time to let the thickened epoxy rest long enough before adding the glass, so there are quite a few airpockets in the seat. I filled most of them today with some excess epoxy with micro-balloons. I’ll spray it with filler and then gray paint later, so the pockets will not be visible.
Diana 4: 2nd fuselage
Two days ago we built the 2nd Diana4 fuselage (mine). Today we released it from the form. It’s the best one we built so far. When we built the first one a few weeks ago we used a new resin for the first time(Hexion EP-Harz L285 LF and Hexion-Härter LH 285 (LF1), both from Suter Kunststoffe AG), one that has a much shorter processing time (50 minutes). The advantage is that the when layering the glass, the first layers are more stable and less likely to shift as you’re building up the layers. The disadvantage is that you really need to mix only small quantities of epoxy (we mix 100+40gr) and must time the mixing right. We quickly learned this when building the first fuselage. For the second fuselage we got it right from the start. The result is a fuselage that has much fewer airpockets (haven’t found any so far) and one that’s also quite a bit lighter (1288 instead of 1428gr).
Diana 4: first fuselage in the mould and first assembly
After our building team colleague and master painter Andi painted the JS3/Diana4 moulds last week, today Georg and I built the first fuselage. It’s always a bit harder to build the first one after a break of almost a year, and are using a new epoxy resin and a different size 160gr glass, which also takes a bit of getting used to. Include setting up the workshop, other preparations, waiting before joining the two mould halves and cleaning up afterwards we almost spent the whole day working.
While we were waiting for the epoxy to cure a bit before joining the two halves of the mould, excitement got the better of us and we put the wing and elevator shells that Georg finished over the weekend on the fuselage of his scratch-built JS3 (the same fuselage we are using for the Diana 4). The result looks great.
Joining the fuselage halves went very well. We will release the first Diana4 fuselage from its mould on Wednesday afternoon.
Diana4 and Ventus 2C: Wing joiners and ballast tubes
In-between other tasks I’ve been preparing the sleeves for the wing joiners and the ballast tubes for the 4.5m Ventus 2C and the 5.14m Diana 4. I’ve also given my new vacuum pump a test run and have done most preparations to build the elevator and rudder for the Ventus 2C.
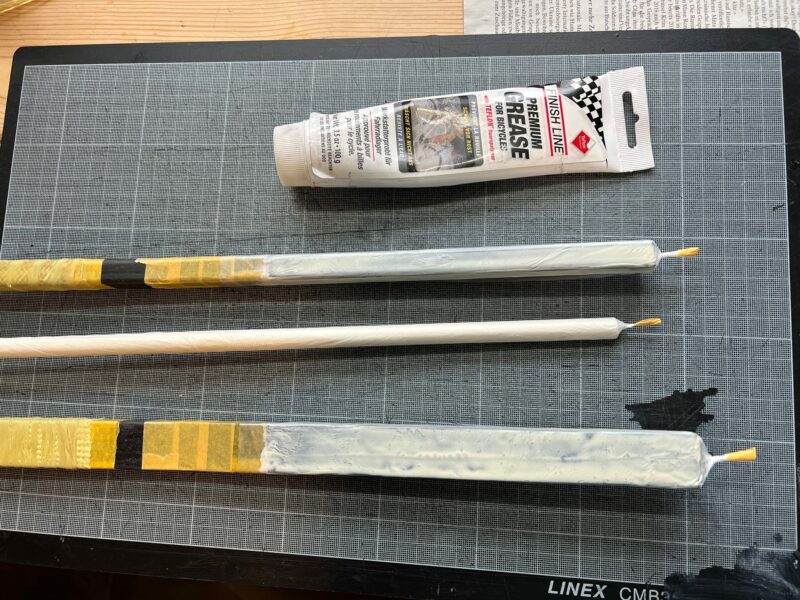
The sleeves for the wing joiners are done as usual: first liberally apply Teflon bike lubricant to the wing joiner and wrap it 1.5 times with a thin plastic bag. Then pull over a kevlar tube and wrap it with kevlar rovings. Then tightly wrap the whole thing with tear-off fabric, put a weight at the end and hang it out to allow the epoxy to cure. We always leave the sleeve on the wing joiner while building the wings and only pull out the wing joiner once the wing shell is done.




You must be logged in to post a comment.