Georg, as usual, is the first one to have his Elfe built. On Tuesday we had the maiden flight, in excellent spring weather. Also as usual, we did this in aerotow, with Andi towing. The maiden flight went very well, although landings were tricky – the crow/butterfly settings still need adjusting – the Elfe appears to be quite sensitive on this.
The first impression is that the Elfe is a perfect mix between two of my favourite planes: the JS3 and the Moswey III. It picks up thermals very well and likes tight turns, with very easy handling. Georg will be fine-tuning the center of gravity and the throws over the next few weeks, after which it should fly even better. My elfe will probably only be finished next spring – I will close the 2nd wing and then focus on finishing my Diana 4, which is back from the paintshop. More on that – as well as a video of the maiden flights – later.
After an incredibly busy few weeks, also including some great flying weather, today I finally had time to close the first of my Elfe S3 wings, with the help of my flying buddy E.P. It’s resting in vacuum now
Preparing the upper side of the wings is done very quickly. The next step is much more work: preparing the inside of the wings for closing. This requires cutting out the foam for all the inserts as well as preparing the rohacell, carbon sleeves and plywood bits. More details on that later, just some pictures for now. The wings are now ready to be closed.
The vacuum pump is running in my workshop on wing nr. 2 (upper side), so some time to sit behind the computer and look at the decals and logos.
We will be using HB-935 and upwards for our Elfes. The decals are pretty standard: the registration number, a Swiss cross as well as the initials of the pilot/builder. We also decided to add a nice Elfe S3 logo under the canopy. There are various versions in pictures online, see some examples below. I used these to draw our own logo.
Make sure you clean the wing cores from any “angel hairs” resulting from the cutting (using a vacuum cleaner with brush).
Prepare the negative “covers” with packaging tape that doesn’t stick to epoxy resin (try out different brown tapes – we’ve found that the one sold at the Landi in Switzerland works very well – and is very cheap).
Prepare building board, so that you can tape the negative of the underside of the wing into the right position onto the building board.
Tape the negative of the underside of the wing into the right position on the building board and also prepare it with brown packaging tape.
Prepare the ebechi (abachi) wood (0.8mm) by lightly sanding it nice and smooth and paint it with nitro base primer (nitro hartgrund) to ensure that the ebechi doesn’t absorb too much of the epoxy resin.
Prepare the carbon fabric (we prefer to use biax ±45° 100g/m² from Suter – it’s got great torsional stiffness and is very easy to work with). For the upper side I use carbon for the entire wing area. Georg likes to only use it in the area of the D-box, the control surfaces, the wing joiner and where the servos are glued in). I’ve found that the weight penalty of doing the entire wing in carbon is minimal (20-30gr per wing) and it gives the upper side of the wing a much nicer shape, with less deformations.
Once all that is done prepare the epoxy resin (I used around 100gr in total of epoxy and hardener). Using a soft roller, first apply some to the ebechi. Then put the carbon fabric onto it and roll to “pull up” the epoxy. Add more epoxy resin as necessary. You can use a hard roller and some kitchen paper to remove excess epoxy (I “removed” around 6gr on the entire wing – very minimal).
Assemble all the bits of the wing into the negative, making sure the wing cores are in the right position, cover with the negative “covers”, making sure you fix key bits with a bit of painters tape.
Then put the whole building board into the vacuum bag. Start the vacuum pump and leave it running for 10-12 hours at -150mbar. I use a webcam and a timer so that I can check the pressure from time to time (although my vacuum pump has no trouble keeping this up).
On Thursday Georg and I built Fuselage nr. 4 of our Elfe S3. Today we took it out of the mould.
Andi had again spray painted the mould very nicely. Building went a bit faster than last time (we usually need between 5 and 6 hrs with two persons). The upper side of the fuselage looks great. The underside has more airpockets at the rear, we probably didn’t press it enough with the small rollers after closing the mould. It’s not a big problem to fix though, as the fuselage will be painted afterwards anyway. The weight is just over 1.5 kgs – also within the usual range.
While I’ve been focussing on getting my Diana 4 ready for the paint shop, the other members of the building team have made significant progress with their Elfe S3. Georg’s Elfe is already back from the paint shop, and the ones built by Richi and Andi are not far behind.
Time for me to put myself behind the computer and design the instrument panel for the Elfe S3. Here we are both lucky and unlucky. Unlucky in the sense that we’ve not been able to get good pictures of the cockpit interior of the Elfe S3. Lucky in the sense that the Elfe S3 was built in so many versions and changed so much over time that we can really do what we want with the instrument panel.
I’ve used the picture of the instrument panel of the HB-902 an an example to construct the panel below. The PDF file linked through below is to size for our fuselages. The HB-935 immatriculation is the one to be used by Georg for his Elfe S3.
The first fuselage of the Neukom Elfe S3 is out of the mould and it looks great. We spent almost six hours building up the fuselage in the mould – longer than expected. This because it’s the first time we are building in this mould and we were still “getting to know it”. An additional challenge was that we decided to use up an old stock of “atlas” glass cloth – which has a finer weave and is lighter, but was more difficult to place into the mould (and kept on making little “waves”). Plus we used our new epoxy resin, which only has 50 minutes before it starts curing and becomes too thick (i.e. we had to use multiple small portions but were still faced with tools that got stroppy and lower layers of glass where the epoxy was curing faster than we would have wanted). Considering all these challenges, we were surprised that the fuselage came out so well.
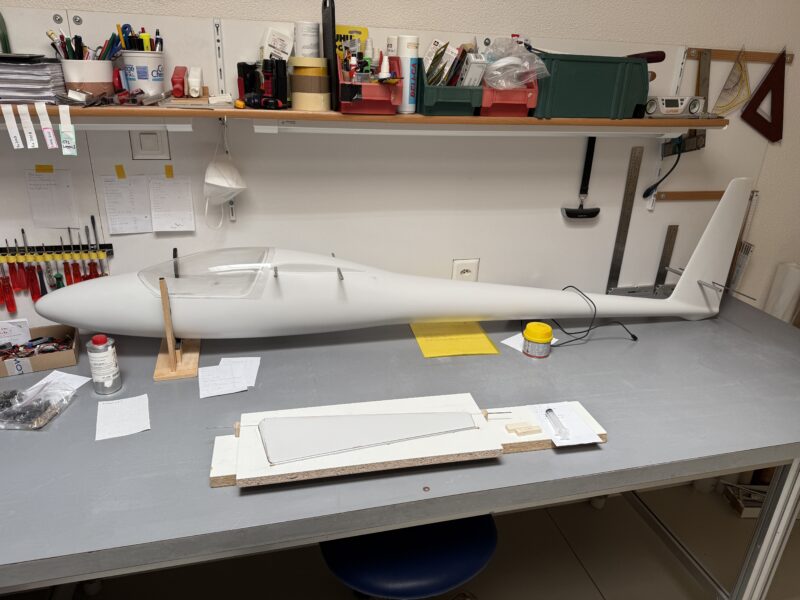
In the excitement of seeing the first fuselage we had to fit the horizontal stabiliser and rudder that Georg has already built, as well as the prototype of the canopy (we are awaiting the rest of them in the next few weeks). We’ve still to weigh the fuselage and check for air pockets.
I’ll give an overview of the glass layup of the fuselage in a next post.
I prepared the four wing joiners four our Elfe S3 last winter already. Now that we have the fuselage sizes I could do the sleeves around the joiner, that will go into the wings. These are made of woven kevlar, with a second string of kevlar wound lightly around it. I first made the wing joiner nice and greasy using bicycle grease (a really thick coat), followed by 1.5 rounds of clingfilm or thing plastic vegetable bag. The kevlar sleeve is epoxied around that. I then apply tear-off tape and hang a weight at the bottom of the sleeve and let it cure. Once cured, repeat that for the other side of the joiner.
I’ve started building the horizontal stabiliser. Although the stabiliser will be in two parts, we built is as one – including most joiners – separating it afterwards.
We cut the foam a few weeks ago and Georg made a great plan for building the stabiliser – as usual (all by hand – see the last picture below). I prepared the carbon and glass layup, to be placed between the foam and ebechi, applied the epoxy and put the first side in a vacuum bag for 11 hours. I then cut out the various openings for the 10×1 carbon tube with glass sleeve (main joiner for the two halves), balsa where the 4mm steel pin joining the two halves will come, as well as small brass tubes with the 2mm steel pin for the elevator control. I also cut out a foam strip, inserted it into a carbon sleeve, which will be where the elevator will separate from the tailplane. Also make sure you remove a bit of foam from the leading edge and add in some thickened epoxy, so that you can sand it into a nice leading edge afterwards. Plus I inserted small bits of plywood at the end of all three pins connecting the two halves to prevent that these pins are pushed through into the foam when building up the plane later on. Then I epoxied the carbon and glass inserts onto the ebechi, closed the stabiliser and again put it into vacuum for 11 hours.
Once fully cured, I carefully separated the two halves of the stabiliser and sanded back the ebechi and the leading edge into shape.
The fuselage mould for the Elfe S3 is done and ready to be spray painted so we can start building the first fuselage.
Here is how we made the fuselage mould:
– Using the right wax in the right places is key. For building the fuselage mould we use: 1) a coat of HP-G1000 priming wax (HP Textiles); followed by 2) three coats of a release agent based on polyvinyl alcohol, dissolved in a mixture of ethanol and water (SCS PVA-folientrennmittel). We’ve used this for building all our recent moulds and never had any issues releasing the plug from the mould..
– Following the fitting of the plug in the parting plane and filling the gaps between the parting plane and plug with blue tac, the separator for the tailfin is mounted, the holders for the centering pins are placed into the parting plane and the edges of the mould are marked by brown packing tape (also marking the part of the parting plane that needs to be waxed). A foam bloc is places in the space for the canopy. Also the various pins for the gaps in the fuselage for attaching the wing and horizontal stabiliser are set and waxed.
– Next we build up one half of the fuselage mould on the plug and parting plane. The layup of our mould is as follows (note that we only make around 4 fuselages out of this mould, so it doesn’t need to be super-robust):
First a coat of special mould resin (we use Formenharz P from Suter/R&G). This needs to cure for a while (1-1.5hrs) before we can start on the next layer;
Put a smal strip of 25-30gr glass on the parting plane, tightly around the plug, followed by thickened epoxy resin, so that the edges of the mould are reinforced and minimising the chance of air pockets;
Build up epoxy resin thickened with cotton flakes around key areas such as the connection to the wing and around the pins for connecting wing and horizontal stabiliser, but also ridges around the canopy;
Apply the glass. Each layer of glass becomes a bit of extra epoxy – enough to fully soak it. The epoxy is evenly distributed using a small roller, which is also used to ensure that no air is trapped underneath the glass. We add the following layers of glass:
2 layers of 165gr glass
1 layer of 280gr glass
1 layer of 280gr glass around the edges of the mould, not on the plug
1 layer of 280gr glass
1 layer of 280gr glass around the edges of the mould, not on the plug
1 layer of 280gr glass
2 layers of 165gr glass
Build up epoxy resin thickened with cotton flakes around the pins for connecting wing and horizontal stabiliser as well as around the holders for the centering pins for the mould;
Apply tear-off fabric to the places on the fuselage mould where the plywood feet are to be added
We let the first half of the mould rest for about a week. After a few days we added the plywood feet (three).
After a week we very carefully removed the parting plane (leaving the plug in the half-mould!) as well as the tailfin separator. We then added a new tailfin separator as well as the holders for the centering pins and foam for the cutout of the canopy.
The 2nd half of the mould is then built up in exactly the same way as the first half – see above.
We then again let the mould rest for about a week, adding plywood feet after a few days.
After this week the edges of the mould are cut off and rounded, after which the mould is carefully separated and the plug removed.
We then sand out any uneven bits from the mould using 600 or 800 grit sandpaper (wet) and then polish the mould progressively using 1000 and 1500 grit sandpaper (wet) followed by polishing/cutting past. After another cleaning, the mould is now ready to be waxed and then painted for the first fuselage.
It’s time to get back to the workshop and start building again. I still need to finish my Diana4, which has been on the back burner while I finished my Monerai. In addition, we are resuming the work on the Neukom Elfe S3.
In the past few weeks, Georg has prepared the parting plane for the fuselage plug. I helped him set up the workshop to prepare building the fuselage moulds and fitting the plug into the parting plane (so that it’s perfectly centered). He will now fill the gap between the plug and parting plane with paste (bostic/blue tac) and wax the plug and parting plane.
We also started cutting the styro foam for the wings and elevators.Over summer Georg built a nifty foam cutting installation. It works really well and ensures an even nicer hot wire cut than the manual cutting we did in the past.
The plugs for the fuselage and the rudder are ready. Our shaper Richi has done an amazing job, as usual. The part where the wings join the fuselage was particularly challenging, as we will be using a pretty thin airfoil – unlike the original Elfe S3. With the wings sitting at the top of the fuselage Richi had to be creative in shaping that part of the fuselage.
Next step is building the moulds. We will probably only do the fuselage mould in Autumn – unless we are faced with a few weeks of non-stop rain. Georg has however started preparations for the mould of the rudder, which he will build. He will also be making four rudders for the four Elfes that we are planning to build. The wings will be in our usual styro-ebechi with carbon and glass layup building method.
Over the weekend I’ve been doing some background research into the Neukom Elfe S3 – in particular to find more information for the decals and cockpit for our Elfe. This post summarises the main points that I’ve found, as an effort to bring together key bits of information for further use as we work on our models. Note that Neukom was known for continuously improving/tinkering with his gliders, there are various versions of the S3, the below list also includes the S2/3, bot the x-tail and v-tail versions.
As far as I could find, in total 12 ELFE S3 (including a few S2/3) were registered in Switzerland over the years. Only two of these seems to be registered/flying in Switzerland still. Two were exported to the US and are still registered there. One is in the Transport museum in Lucerne:
HB-902, ELFE S 3 P, Baujahr 1968 Werknummer 18: still registered, stationed in Schmerlat
HB-903, ELFE S 3 P, Baujahr 1968 Werknummer 17: removed from the aircraft registry on 16 August 2012 following serious damage after outlanding on 4 August 2012. Official incident report (p. 41-42)
I’m still looking for good pictures from the cockpit. Below are two screen grabs that I took from the 1968 TV documentary.
Addition 3/3/2025: our club colleague Willy W. obtained a further picture of the “old” cockpit of the HB-902. Apparently it’s been modernised now, and we hope to get a picture of the newer version as well. I’ll be adding pictures below as we receive them.
Addition 12/3/2025: our club colleague Willy W. now also obtained a further picture of the current cockpit of the HB-977. I’ve added the picture below.
We use a standard carbon wing joiner for most of our projects. It’s slightly conical and has a 6 degree V-shape/Dihedral. See the picture below for the sizes of the joiner resulting from the mould. The mould for the wing joiner is close to 20 years old. It’s a pretty simple setup, made of wood and aluminium. It has been used countless times and is still going strong. For the Elfe S3 we reduced the dihedral of the mould to 1 degree (the mould allows for this).
Here’s a description of how we build wing joiners out of this mould. All references to materials are to the R&G Webshop.
Setup:
The setup consists of 1) a roll of CF-Roving Tenax-E HTS40 F13 24K 1600tex (Art. 205.0024), mounted on an easy-rolling dispenser; 2) a 70ml syringe with a short piece of tube (I use motorcycle fuel lines) mounted in a self-made holder (to drench the roving with resin)(the syringe is held by a standard broom holder); 3) a small turntable to help cut the carbon roving to the right size; and 4) the mould. See the pictures below for more detail. The syringe and turntable are screwed to my workbench to make sure they stay in place.
Waxing the mould:
We apply three coats of liquid wax. Allow each coat to dry and then lightly polish with a piece of soft cloth. Apply some bicycle grease to the screws to close the mould (to avoid them getting stuck due to a bit of wayward resin).
Prepare the core of the joiner:
Previously we used a rohacell core for our wing joiners. For more recent builds we’ve found that it’s much easier (and cheaper) to use a balsa wood core. We use either 4mm or 6mm balsa. This is put into a 3K carbon sleeve (35mmØ 3K, Art. 200.4008).
Epoxy Resin:
I use two small joghurt cups to prepare the resin. Amounts needed:
I use black colourant to get nice and black wing joiners.
Set aside and thicken some of the resin in the 2nd cup (Aerosil) to apply to the mould and cover of the mould.
Building the joiner:
Apply epoxy resin to the balsa core (in the sleeve) using a small brush.
Apply thickened epoxy resin to the mould (this is to ensure that the surface of the wing joiner is nice and even, without air bubbles)
Then roll carbon rovings onto the turntable. I roll them in sets of 8. Use scissors to cut them into separate rovings at the right length.
Evenly put the rovings into the mould, starting at the edges.
Regularly spread out the rovings in the mould using an old credit card or a piece of wood .
The amount of rovings to use is as follows:
Wing Joiner with 4mm Balsa Core:
50 Rovings above and + 50 rovings below the core. In addition, add on each side of the core 4x13mm und 3x 17mm rovings in the center
Wing Joiner with 6mm Balsa Core:
40 Rovings above and + 40 rovings below the core. In addition, add on each side of the core 4x13mm und 3x 17mm rovings in the center
Note that you may need up to three rovings more on each side, depending on how much resin the rovings absorb (this can be adjusted by squeezing the tube coming out of the syringe – see picture)
Once all rovings and the core are in the mould, close the mould and let the resin cure for a few days.
Our plug builder Richi has been working hard over the holidays and made good progress on the plug for the Elfe S3. Earlier this week he dropped it off at our airfoil designer Georg so that he can prepare the connections for the elevator and the wings to the fuselage.
During the holidays Georg also modified our standard wing joiner mould, decreasing the dihedral to 1 degrees – which we will be building into the root of the wing in addition to the dihedral halfway through the wing. Today I used the mould to build the first wing joiner. See the separate “how to” post on how we build our wing joiners.
We’ve started a new project with our building team: the Neukom Elfe S3. The Elfe S3 is a 15m glider, designed in Switzerland by Albert Neukom. It was first flown in 1966 and entered production that same year.
We are not aware of any recent scale models of the Elfe S3 in this size and, as usual, we don’t have much in terms of original plans to work from. Thankfully the glider compendium of Martin Simons (1965-2000) contains a good A4 drawing. I’ve had this drawing enlarged to full scale, so that our building team member and plug builder Richi can start work on the plug for the fuselage. Georg has started designing the wings. We are likely to build the moulds for the fuselage in Autumn 2025 and the first models in the winter of 2025-26, in the hope that we can maiden our first Elfe S3 in spring 2026.
We will be building a 1:3.5 scale version, so a wingspan of 4.28m. The airfoil will be our trusted MH-32, at 9% (1.7% curvature). We’ve been using this airfoil for our past few builds. It provides an optimal mix of excellent thermalling, speed and agility. We will also use six wing control surfaces and no air brakes. The tailplane will not be all-moving but we will use an elevator. We will also use a retractable gear, like the original.




You must be logged in to post a comment.